Last updated: 2024-12-16
You can now create scheduled workflows to automate processes across SaaS-based applications and users, which helps in streamlining operations by reducing manual effort and ensuring consistent execution.
CONTENTS
Creating a software user workflow
To create a scheduled workflow for SaaS-based applications and users:
1\. Go to Admin \> Automation & Productivity \> Workflow Automator.
2\. Select Software Users under Modules from the left pane.
3\. Click New Workflow.
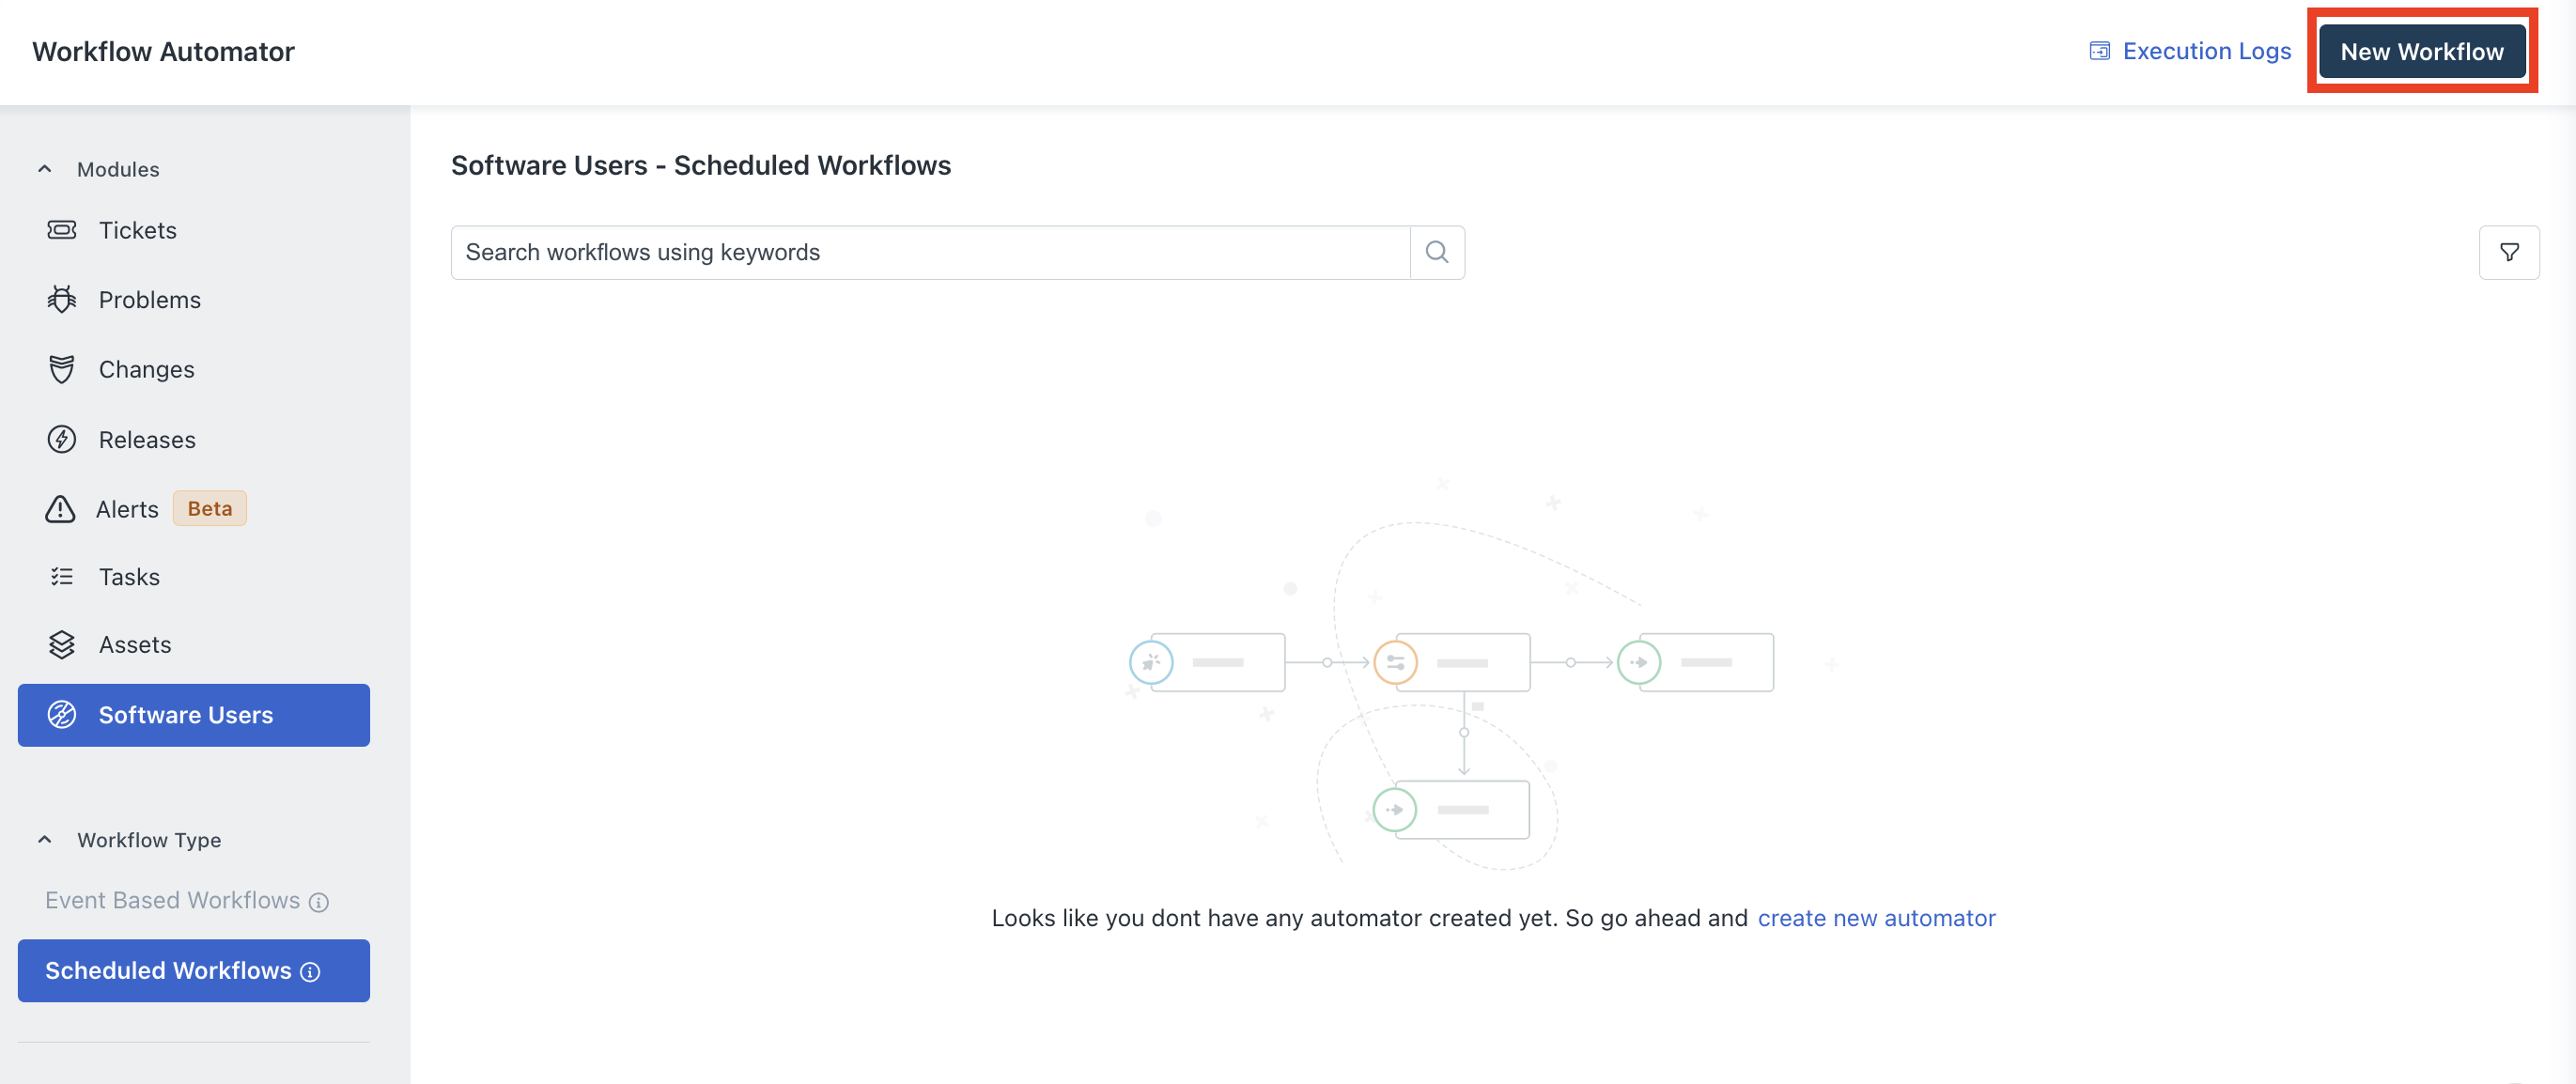
The New Workflow section opens on the right.
4\. Enter a title and description for the workflow in the respective fields.
Note: The Module 'Software Users' and Workflow Type 'Scheduled Workflow' are selected by default.
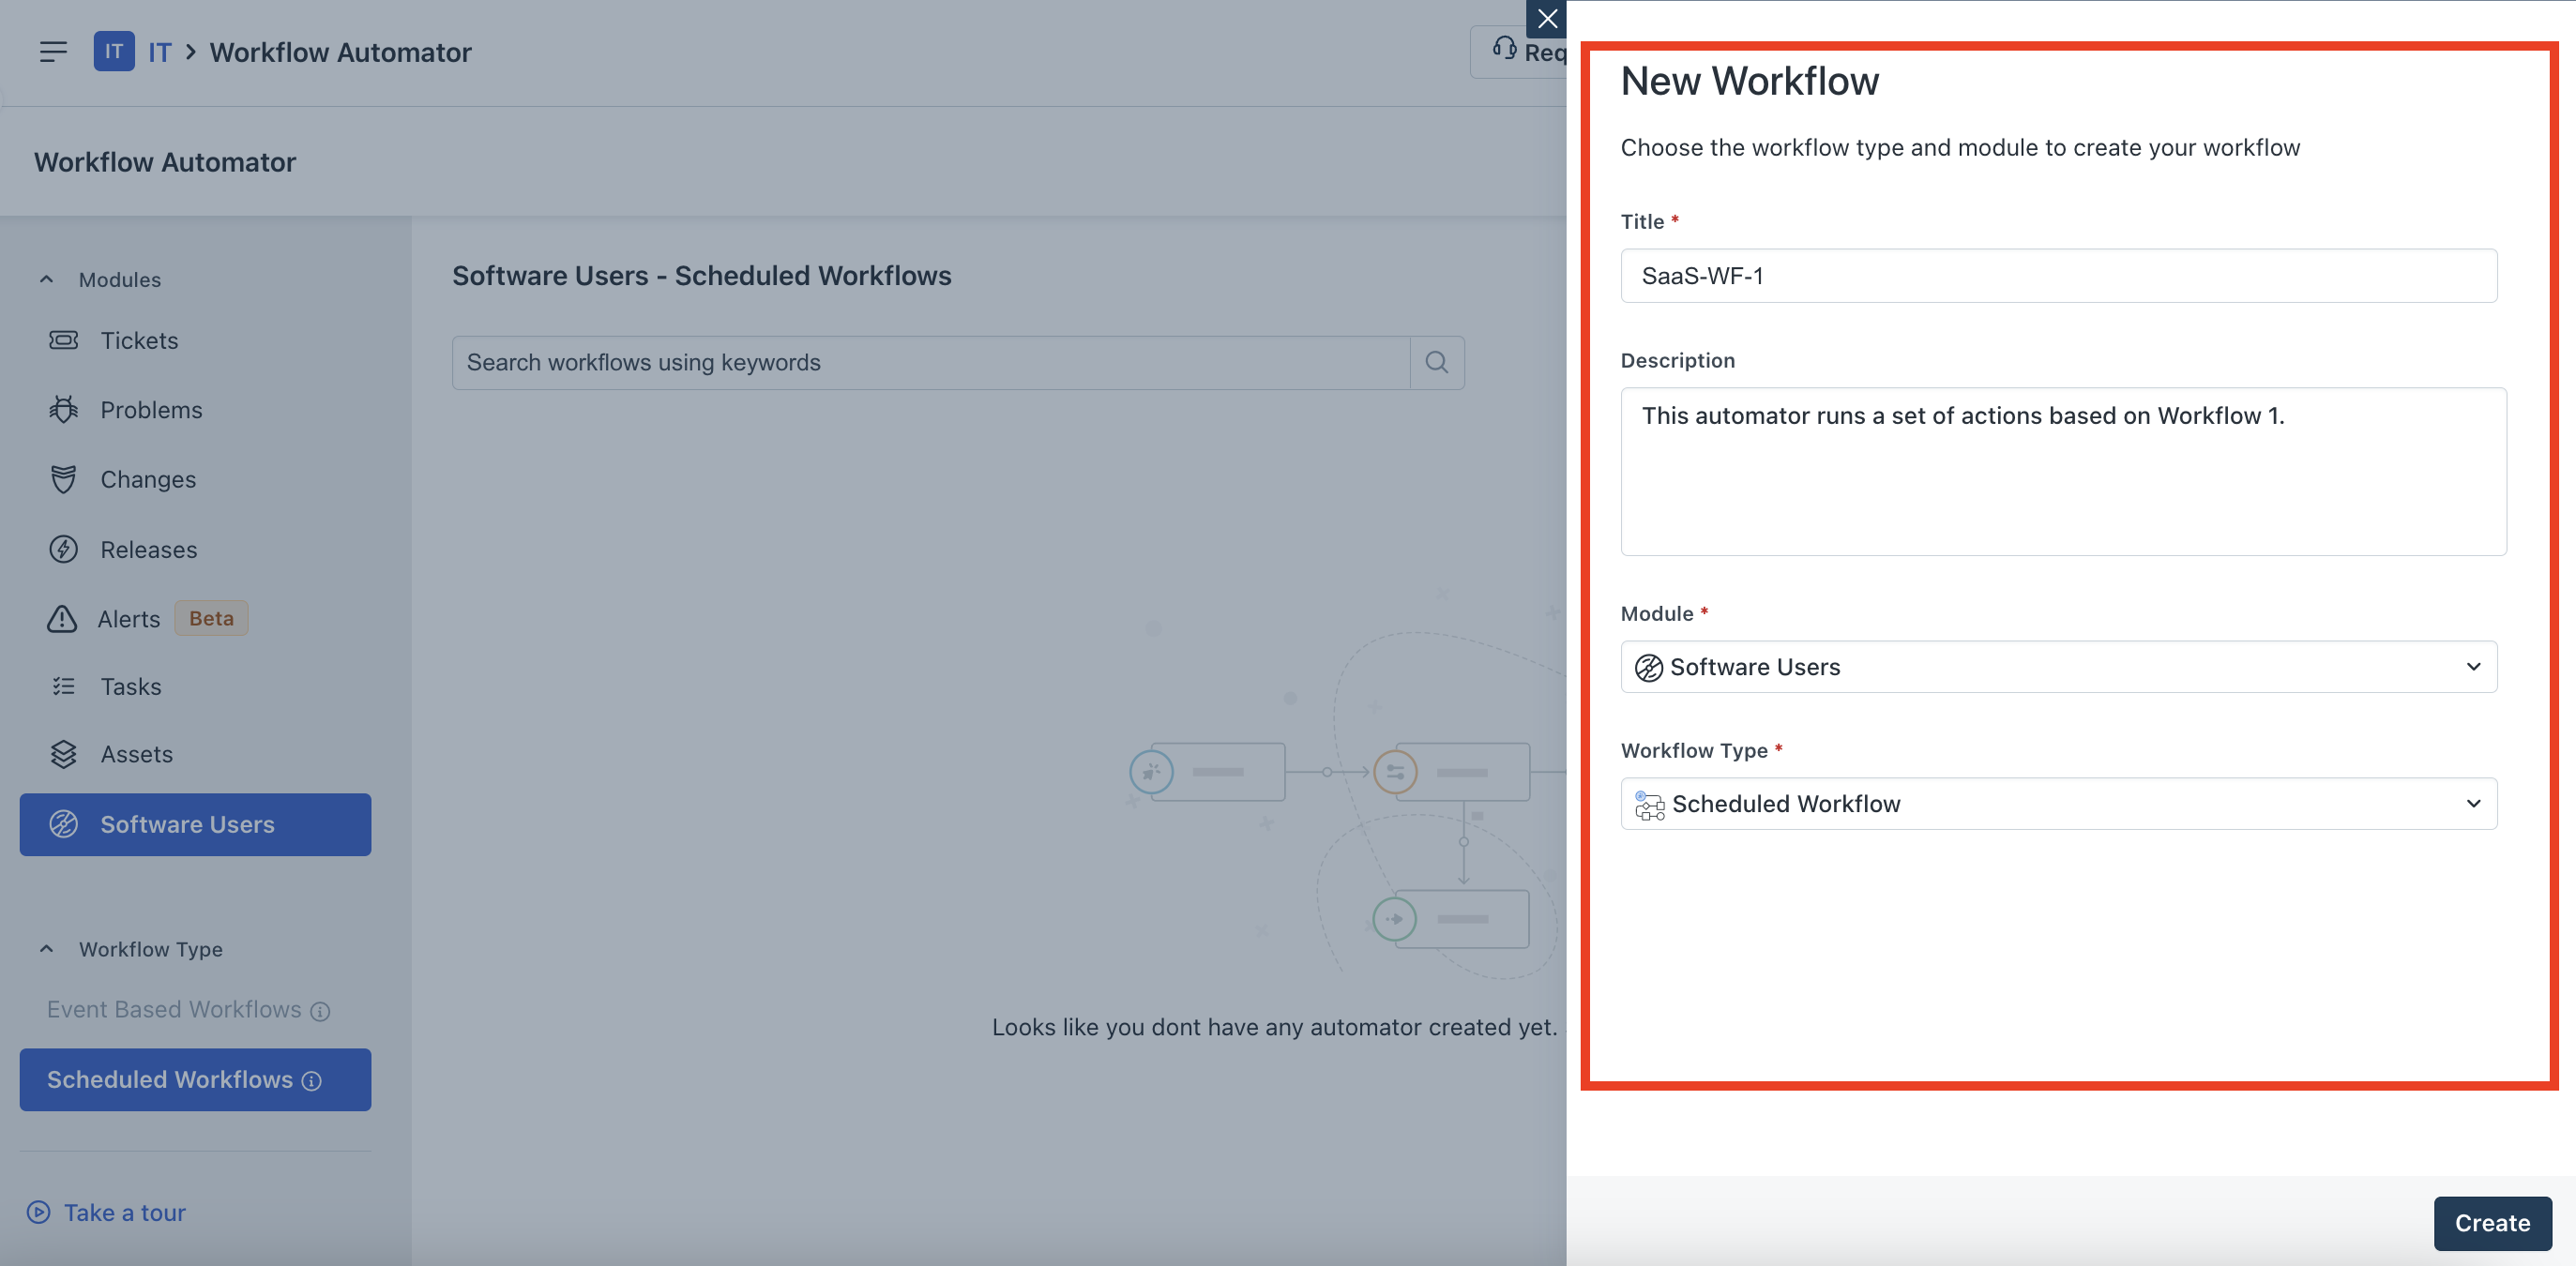
5\. Click Create.
The Scheduled Event page opens.
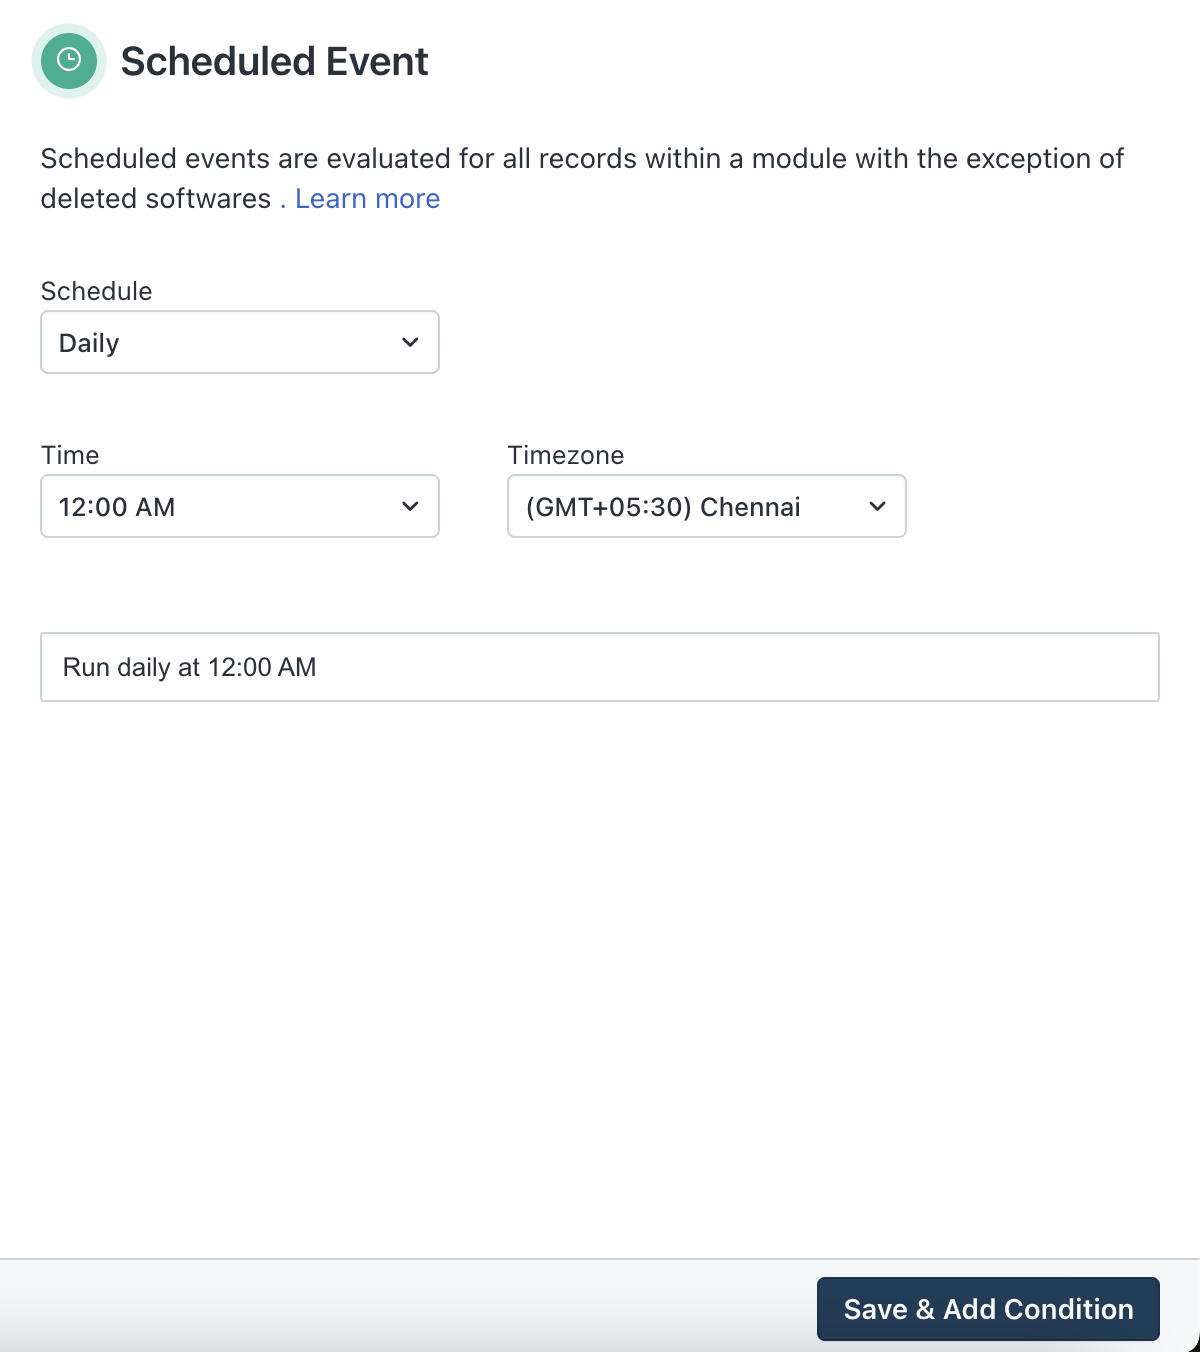
6\. Choose the relevant schedule, time, and timezone for the scheduled event. See _Scheduling an event_ for more information on all the event-scheduling options.
7\. Click Save & Add Condition.
The Scheduled Condition page opens.
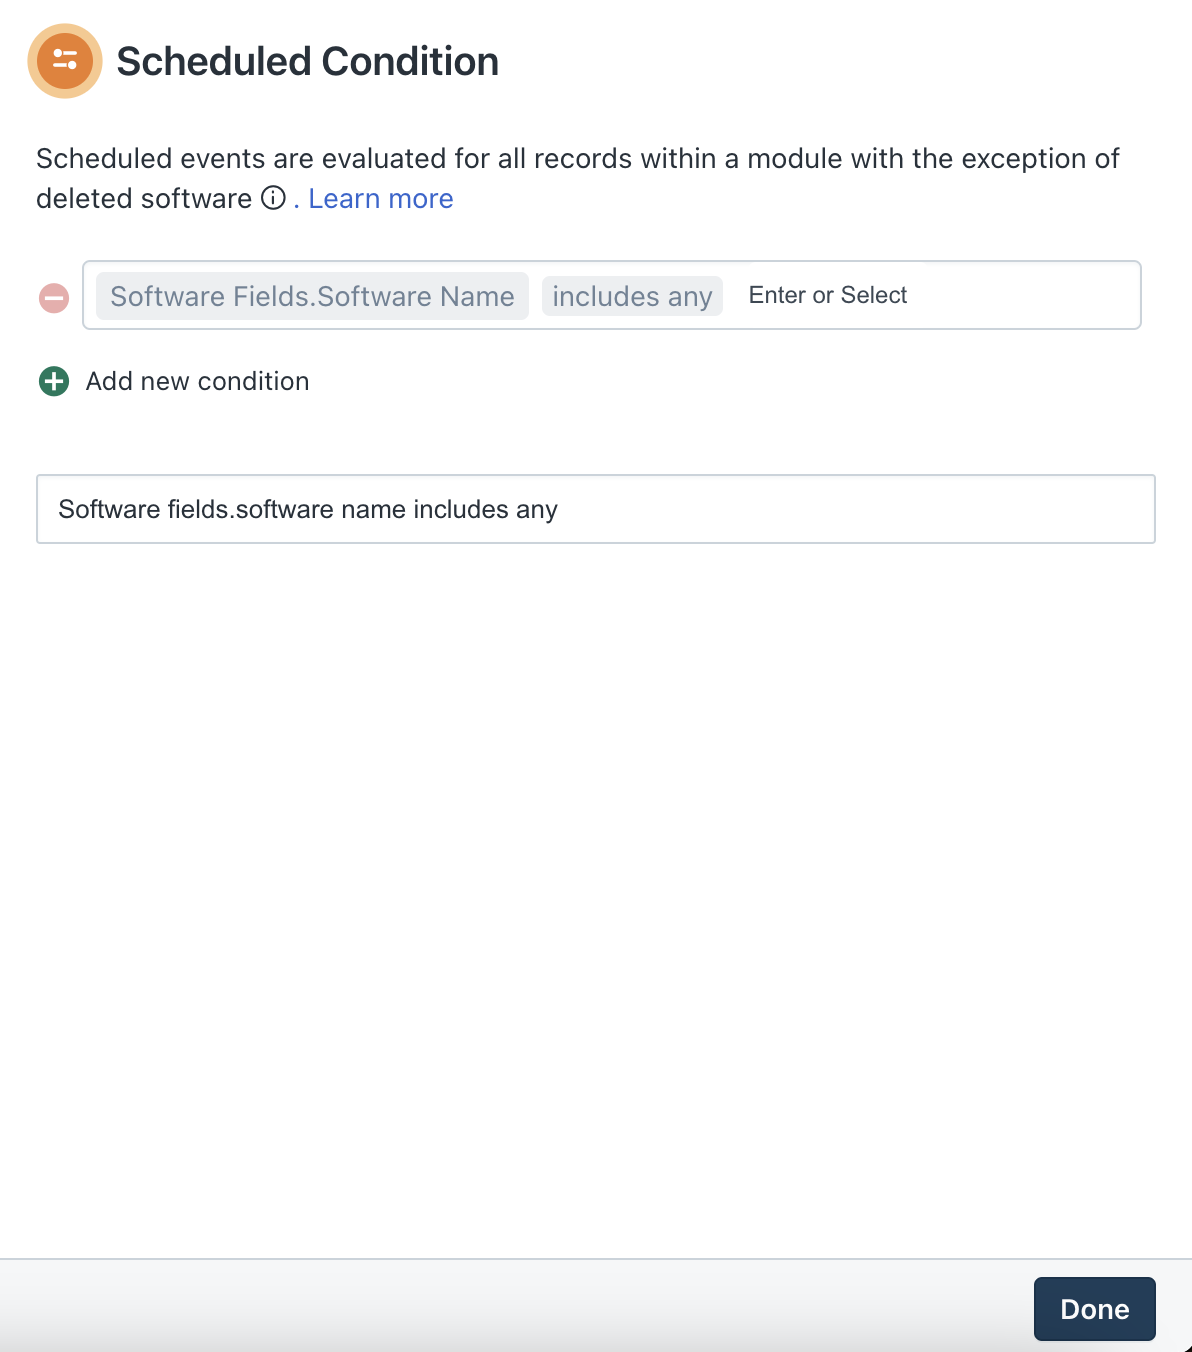
You can add various conditions for the workflow execution based on software fields, software user fields, and user fields. See _Adding schedule conditions_ for more information on all the condition-scheduling options.
8\. (After adding conditions) Click Done.
Scheduling an event
The following table describes the event-scheduling options based on the type of schedule you select.
| Schedule type | Schedule options |
|---|---|
| Daily | When the schedule type is Daily:<br>Select the Time and Timezone preferences from the respective dropdowns. |
| Weekly | When the schedule type is Weekly:<br>1\. Select the Time and Timezone preferences.<br>2\. Select the days on which you want the workflow to run from the Day(s) dropdown. For example, Mon (Monday).<br>Note: You can select multiple days. |
| Monthly | When the schedule type is Monthly:<br>1\. Select the Time and Timezone preferences.<br>2\. Select the date of the month on which you want the workflow to run from the Date of the Month dropdown.<br>3\. Select the months on which you want the workflow to run from the Month(s) dropdown. For example, Jan (January).<br>Note: You can select multiple months. |
| Once | When the schedule type is Once:<br>1\. Select the Time and Timezone preferences.<br>2\. Select a specific date from the Date field. |
Addingscheduleconditions
The following table describes various condition-scheduling options based on the type of field you select.
Note: Use the Add new condition and Add new subconditionoptions to add multiple conditions and sub-conditions (if applicable) for a software user workflow. Subconditions can be added for software applications discovered via direct integration. Use the fields specific only to these applications.
| Field type | Field names | Operators |
|---|---|---|
| Software Fields | You can use software fields to add conditions, such as:<br>_Software Name_, _Status_, _Category_, _Type_, _User Count_, _Installation Count_, _Contract Value_, _Sources_, _Managed By (Email)_, _Publisher_, and _Workspace_ | You can use absolute or dynamic values for conditions, such as:<br>_includes_, _includes any_, _does not include_, _is_, _is not_, _contains_, _does not contain_, _has any of these words_, _has none of these words_, _starts with_, _ends with_, _is empty_, _is not empty_, _greater than_, _less than_, _greater than or equal to_, _less than or equal to_, _belongs to_, _selected_, _not selected_<br>Or, you can use relative values for conditions, such as:<br>_is exactly 'x' days ago_, _is exactly 'x' days away_, _is at least 'x' days ago_, _is at least 'x' days away_, _is not exactly 'x' days ago_, _is not exactly 'x' days away_, _is not at least 'x' days ago_, _is not at least 'x' days away_ |
| Software User Fields | You can use software user fields to add conditions, such as:<br>_User Name_, _User Email_, _Usage %_, _Department Name_, _State_, _Source_, _First Seen_, _Last Seen_, _Assigned Date_, and _Contract_ | |
| User Fields | You can use user fields to add conditions, such as:<br>_User Name_, _User Email_, _User Title_, _User Timezone_, _User Language_, _User Location_, _Department Name_, _Reporting Manager_, _Requester Group_, _VIP User_, and _Employee Code_ |
Note: Once you have created a software user workflow, and set the event and condition schedule; you can perform other actions, read records, parse JSON objects, integrate third-party systems with web requests, and build expressions to perform specific operations.
Sample use cases
Refer the following use cases to get a better understanding on setting up scheduled workflows for SaaS-based applications and users.
Use case 1: Harvesting Zoom user license based on zero user activity
This sample use case describes how to set up a scheduled workflow for harvesting Zoom user license based on zero user activity. In relation to this use case, Zoom users needed a premium license to host meetings above 40 minutes. Hence, employees who do not host meetings beyond 40 mins don't require a premium license.
The workflow enables you to deactivate the following employees in Zoom and reclaim Zoom user licenses:
To create this workflow:
1\. Go to Admin \> Automation & Productivity \> Workflow Automator.
2\. Select Software Users under Modules from the left pane.
3\. Click New Workflow. The New Workflow section opens on the right.
4\. Enter a title and description for the workflow in the respective fields.
Note: The Module 'Software Users' and Workflow Type 'Scheduled Workflow' are selected by default.
5\. Click Create. The Scheduled Event page opens.
1. Select a schedule from the Schedule dropdown (for example, Monthly). Then, select a date from the Date of the Month dropdown (for example, 1). 2. Select the relevant time and timezone from the respective dropdowns. 3. Select the required month(s) from the Month(s) dropdown (for example, Feb, Mar, Apr, and May).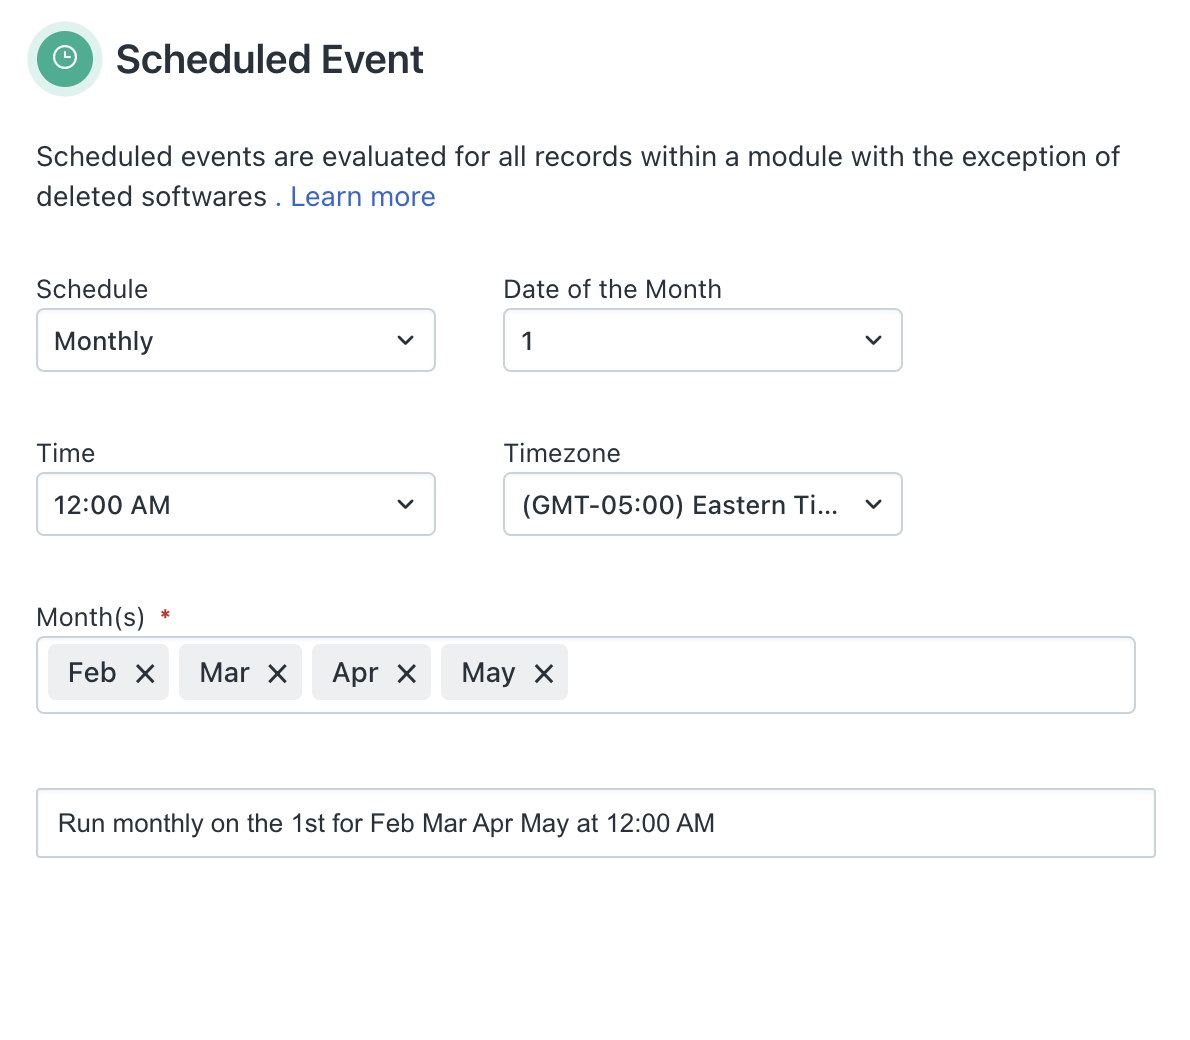
6\. Click Save & Add Condition. The Scheduled Condition page opens.
1. Enter keywords of a software name in the first condition box: Software Fields.Software Name. Then, select the software (for example, Zoom). 2. Click Add new subcondition for the _Software Fields.Software Name_ condition, and select Zoom. 3. (In the following order) Select User Type \> is \> Licensed. 4. Click Add new subcondition to add another subcondition for _Software Fields.Software Name_ condition, and select Zoom. 5. (In the following order) Select Meetings Hosted (>40 Mins) >less than or equal to. Then, enter the number 0. The _Software Fields.Software Name_ condition is now set along with it's subconditions. 6. (To add the next condition) Click Add new condition. Select User Fields \> VIP User \> Not Selected. 7. (To add the next condition) Click Add new condition. Select User Fields \> User Title \> is not. Then, select CIO, Head of Engineering, and Head of Finance. 8. (To add the next condition) Click Add new condition. Select Software User Fields \> Last Seen \> is at least 'x' days ago. Then, enter the number 90.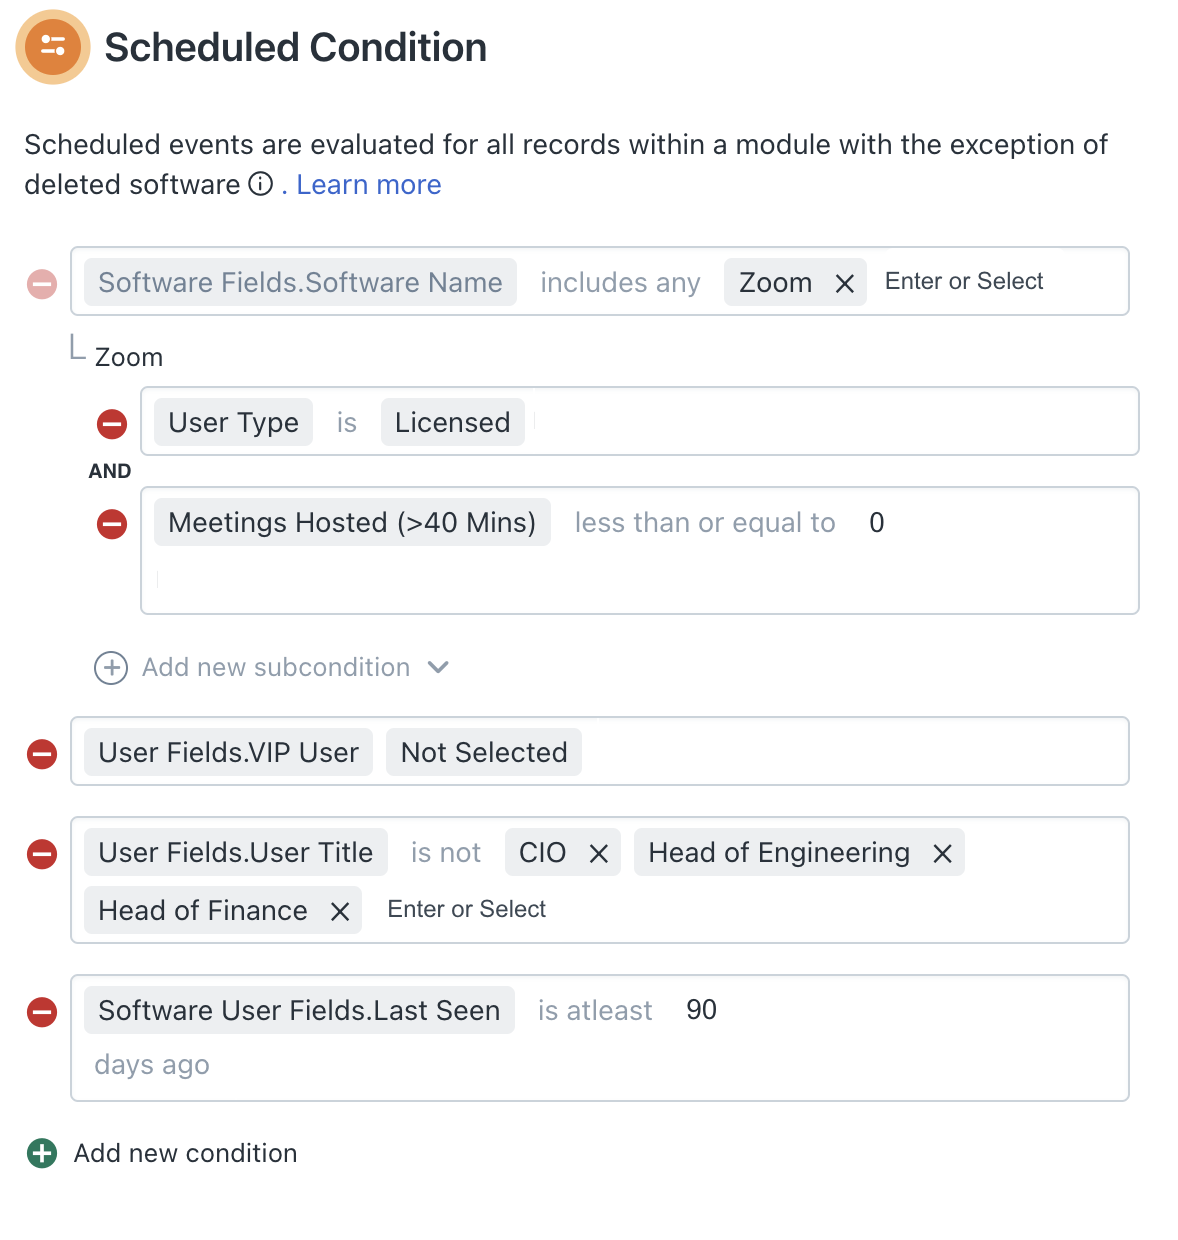
7\. Click Done.
8\. Now, drag and drop the App node (from the left pane) on to the condition block (in the grid area). The App Action page opens.
1. Select Zoom - Orch from the apps list. Then, select Deactivate User with Email. 2. Click the {+} icon next to email under Payload. The Placeholders dialog opens. 3. Select User \> User Email. Then, close the Placeholders dialog.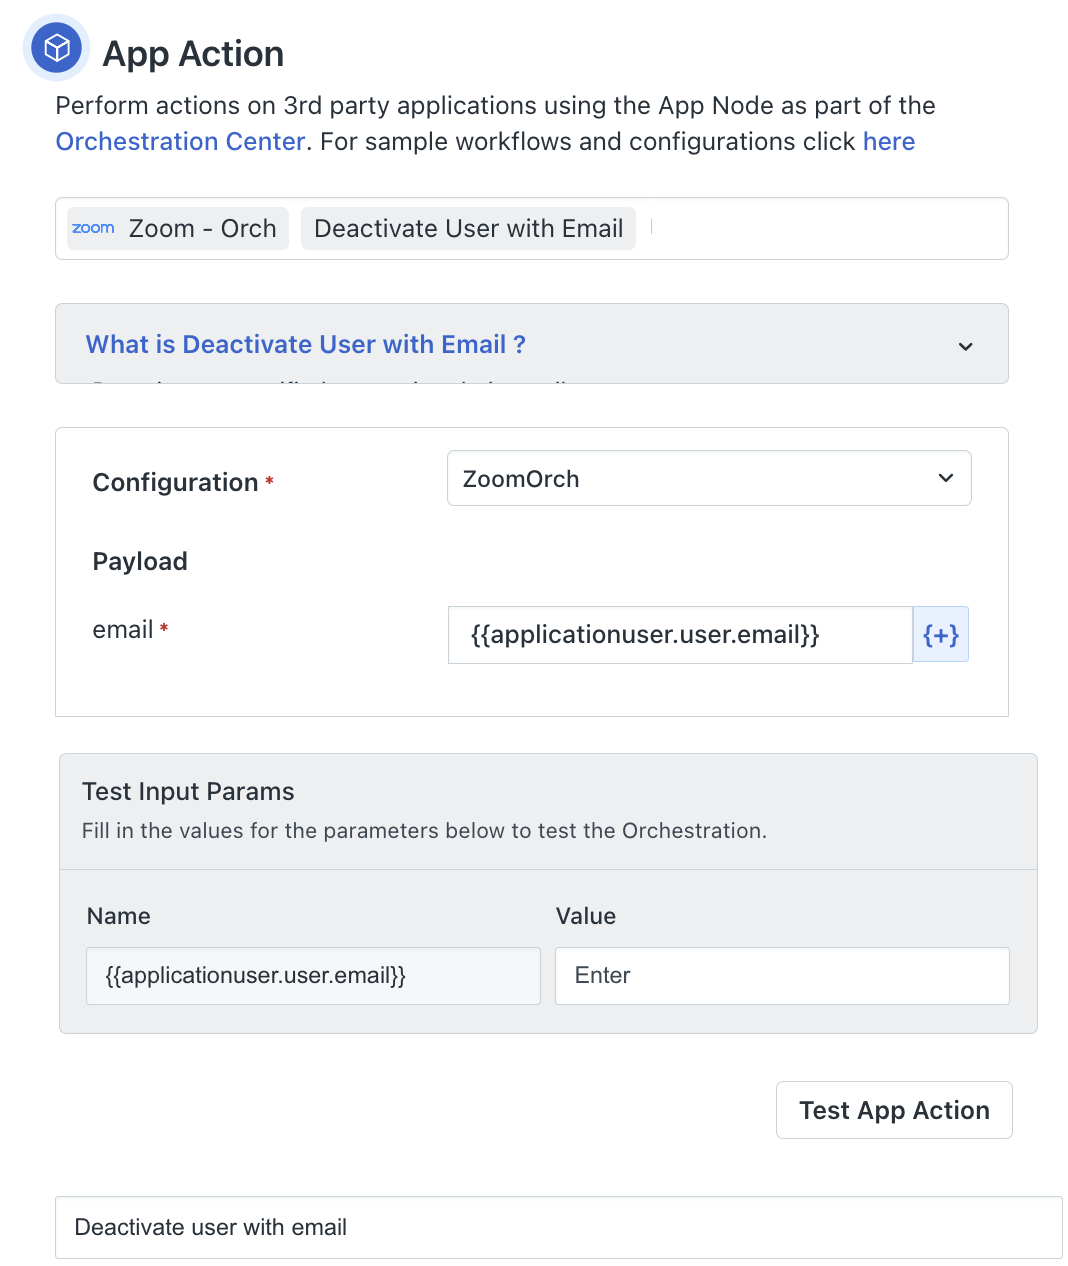
9\. Click Done.
Note: You can modify this workflow to further send email notifications to impacted Zoom users.
You can now activate the scheduled workflow for harvesting Zoom user licenses.
Use case 2: Notifying users on blacklisted/end-of-life SaaS apps
This sample use case describes how to set up a scheduled workflow for notifying users on blacklisted or end-of-life SaaS applications.
This workflow enables you to notify Slack users to switch to Microsoft Teams through email notification.
To create this workflow:
1\. Go to Admin \> Automation & Productivity \> Workflow Automator.
2\. Select Software Users under Modules from the left pane.
3\. Click New Workflow. The New Workflow section opens on the right.
4\. Enter a title and description for the workflow in the respective fields.
Note: The Module 'Software Users' and Workflow Type 'Scheduled Workflow' are selected by default.
5\. Click Create. The Scheduled Event page opens.
1. Select a schedule from the Schedule dropdown (for example, Once). Then, select a specific date from the Date dropdown (for example, 31 Oct, 2024). 2. Select the relevant time and timezone from the respective dropdowns.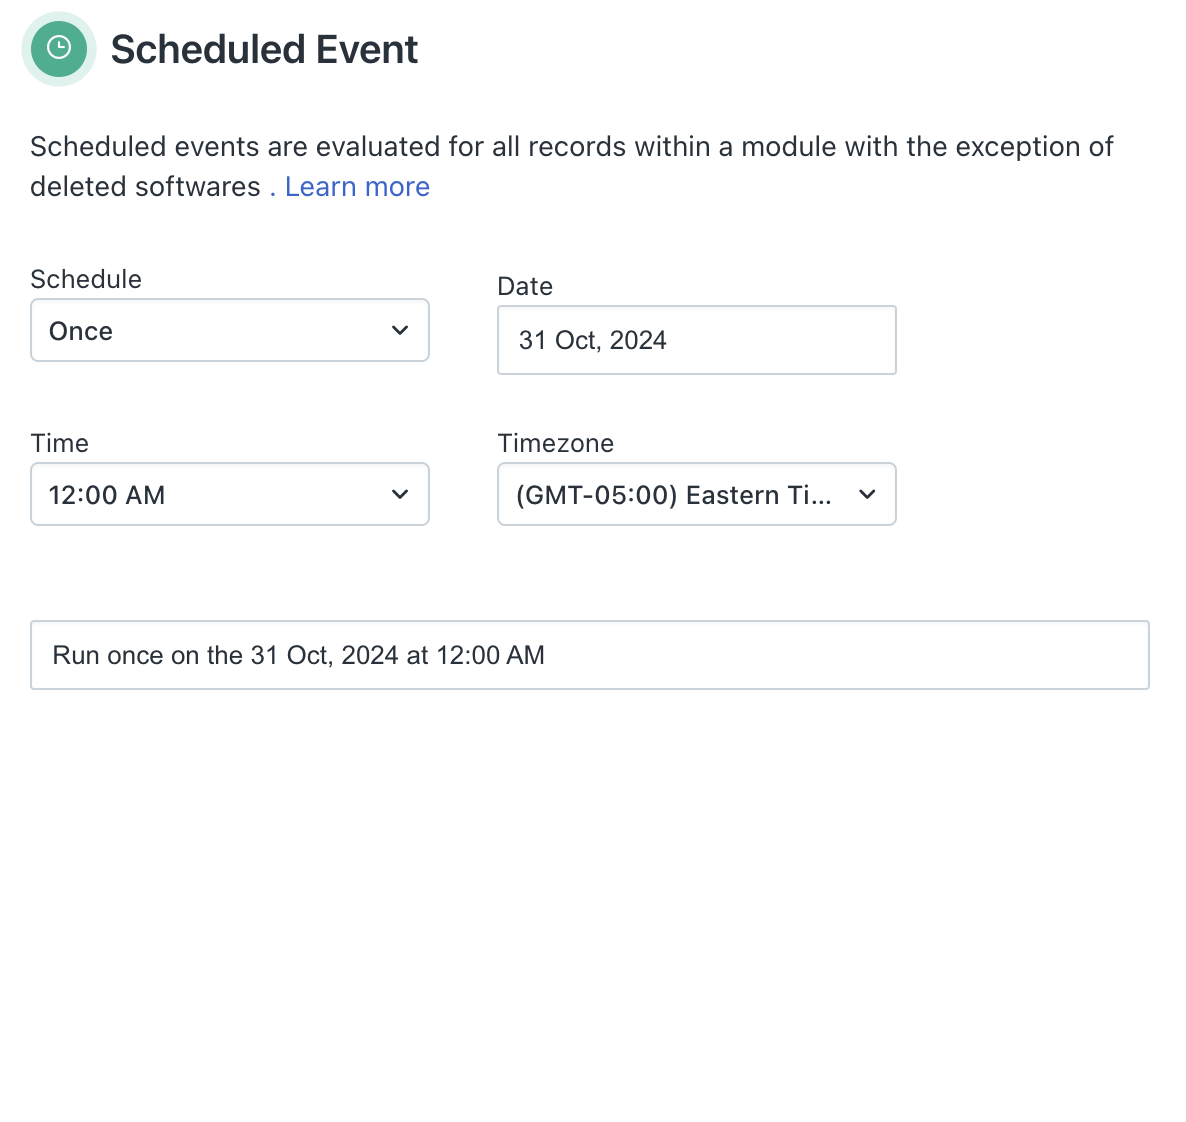
6\. Click Save & Add Condition. The Scheduled Condition page opens.
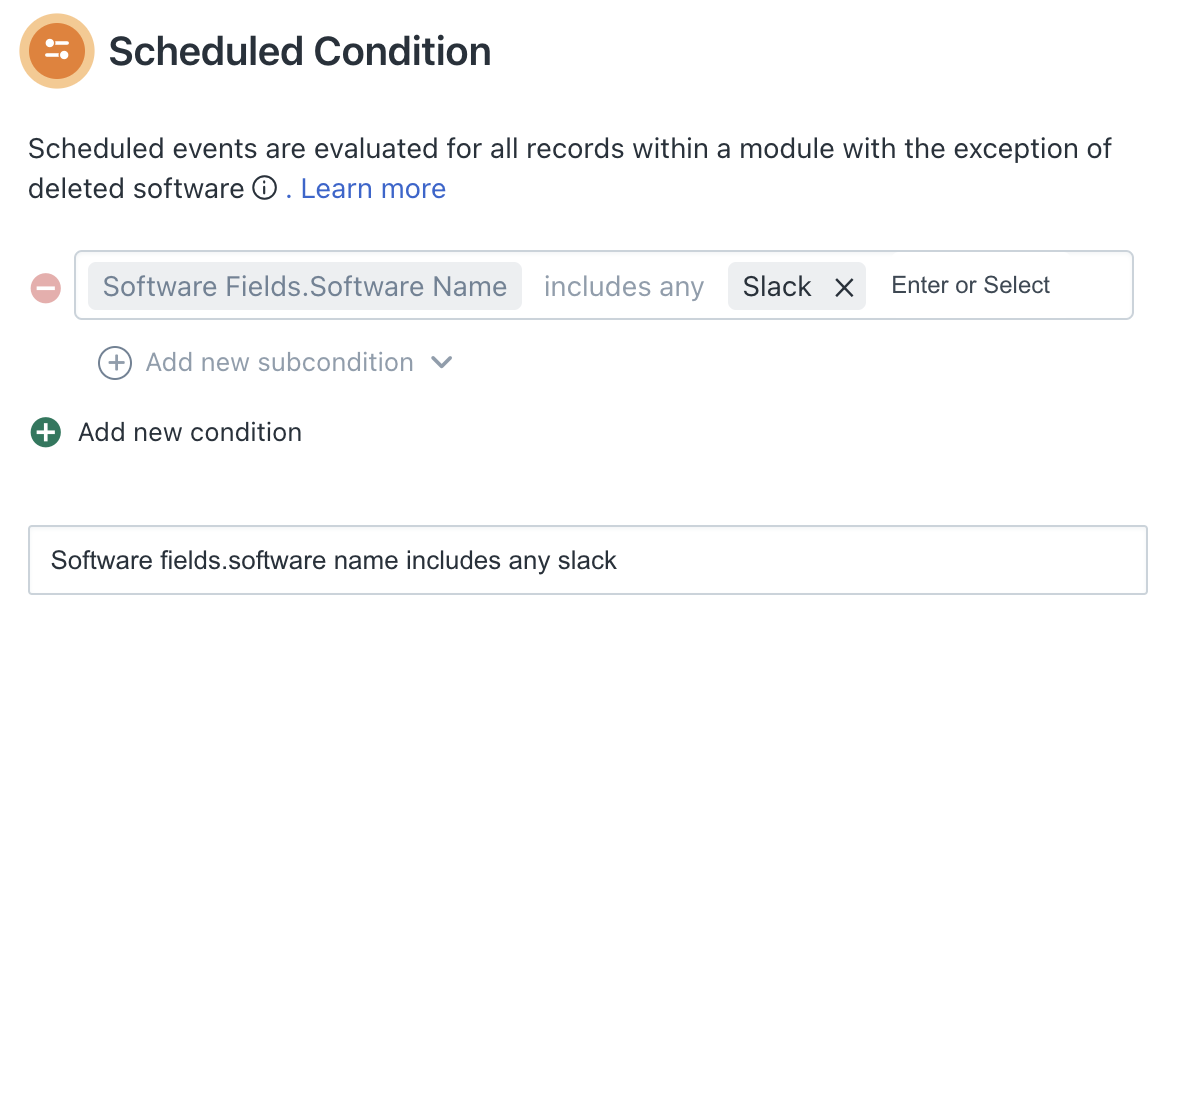
7\. Click Done.
8\. Now, drag and drop the Action node (from the left pane) on to the condition block (in the grid area). The Action page opens.
1. Select Send Email to from the dropdown. 2. Select the sender email address from the From dropdown. 3. Select Software Users from the To dropdown. 4. Enter relevant details in the Subject and Body boxes.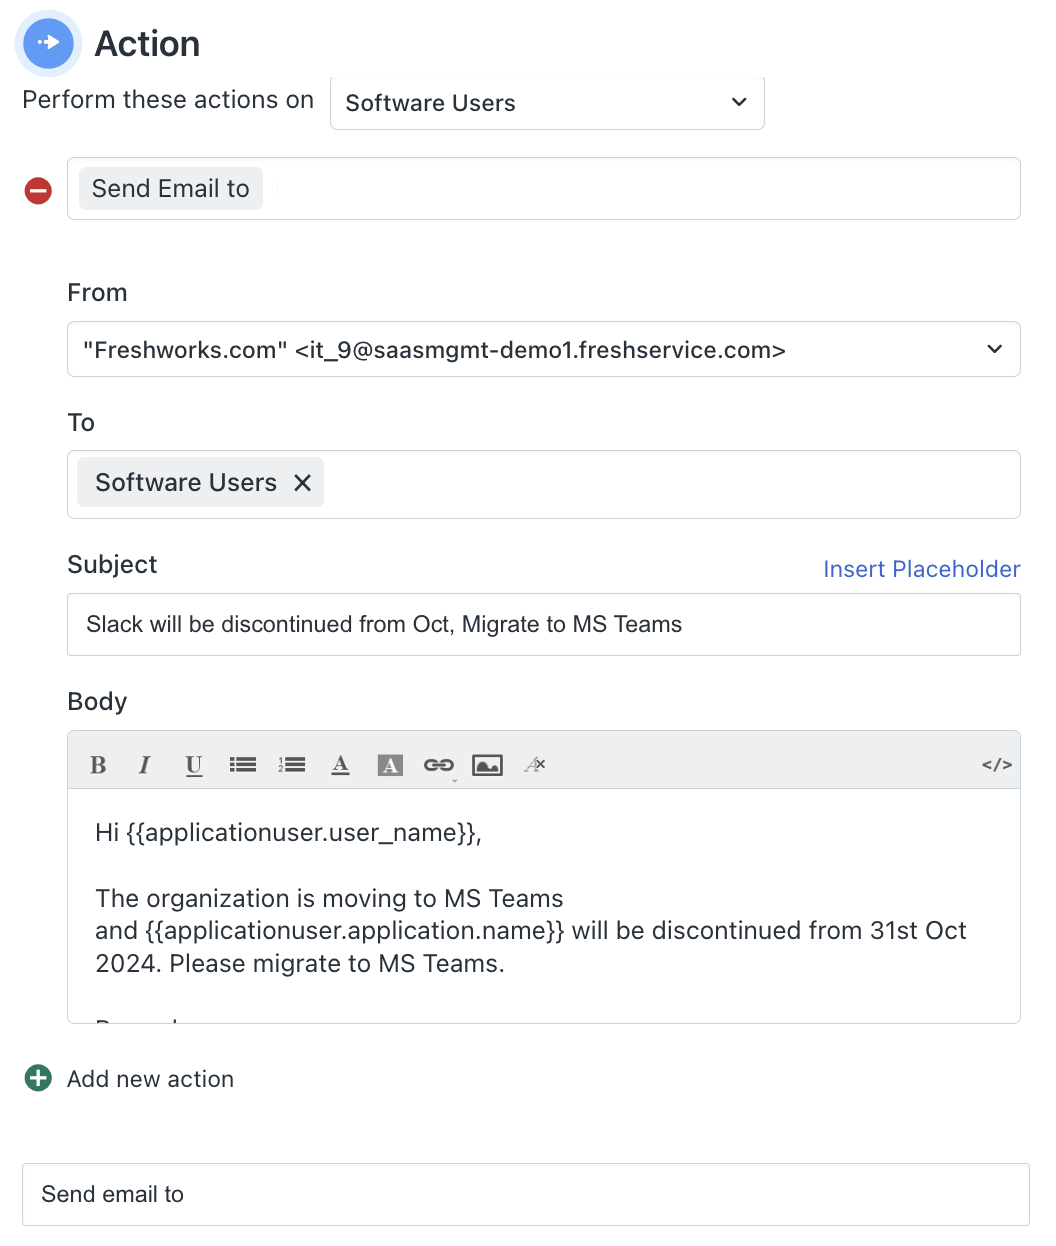
9\. Click Done.
You can now activate the scheduled workflow for notifying Slack users to switch to Microsoft Teams.