Last updated: 2026-05-11
Automation rules that run on Ticket Updates
Automation rules that run on ticket updates allow you to listen for particular events and automate a response to them. This article explains this concept in detail and provides step-by-step instructions for specific use cases.
About automation rules that run on ticket updates
You can create Automation rules that run on ticket updates to react to real-time events in tickets. These rules constantly listen for events you've specified in your helpdesk, match them against conditions, and then perform automatic actions. For example:
Manage your automation rules
To manage these types of automation rules, go to Admin > Workflows > Automation Rules and click the Ticket Updates tab.
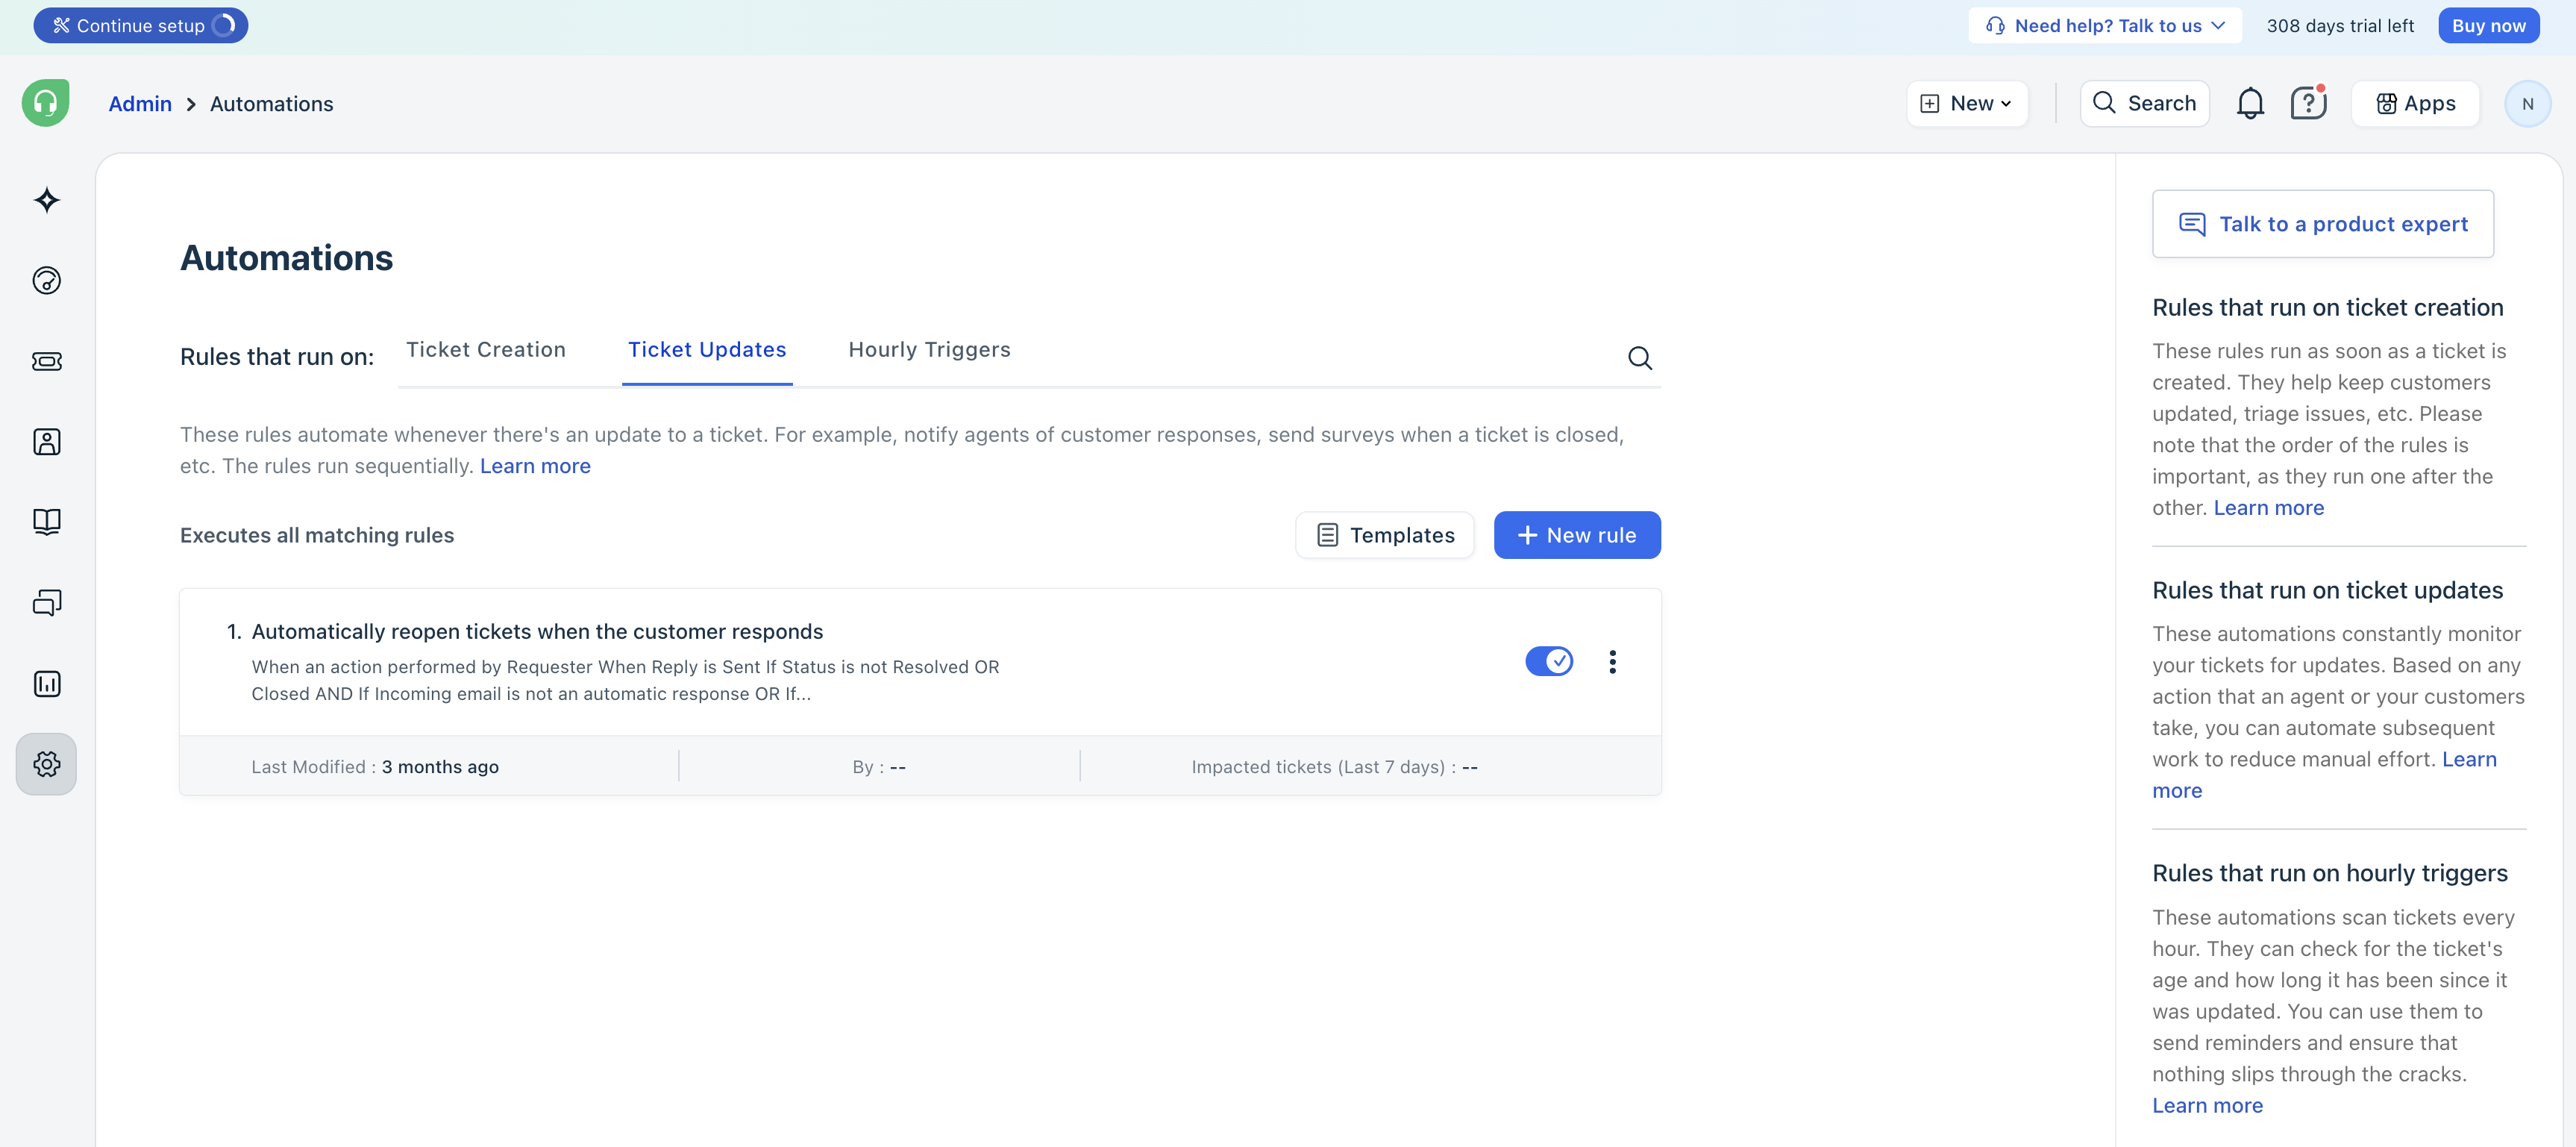
On the page, you'll see the following components:
1. The New rule button: Click this to create a new rule. See below. 2. The Reorder button: Click this to change the order of your rules. Rules are executed from top to bottom. 3. The Search icon: When you have a long list of rules (across all three types), use this icon to quickly find one. 4. Rule toggle: For each rule, use this toggle to enable or disable it. 5. The overflow menu: The triple dot menu contains options to edit a rule, clone it, or delete it. 6. Rule statistics: Under each rule, you can see when the rule was last modified, who updated it, and how many tickets were affected by this rule in the previous 7 days.
Create, edit, or clone automation rules for ticket updates
``` New: You can now create rules for actions performed by Collaborators. ```
When you create a new rule or edit / clone an existing one, you're taken to the rule editing page. This page contains several sections, each explained below:
1. The Rule Name field—Ensure that you write a descriptive name for each rule because this name appears in your list of rules and search results. 2. Event blocks: - When an action performed by—trigger on a specific entity's behavior
 - Involves any of these events—trigger when a particular action occurs.
 3. Conditions block ( On tickets with these properties)—filter when the rule triggers based on values in the ticket or the associated contact or company.
4. Actions block ( Perform these actions)—the automations to perform when the rule is triggered.
Click the following toggles to learn about events, conditions, and actions in detail.
Events
Events determine when the rule is triggered. You must specify at least one event. Click Add new event to specify more. The rule is triggered if any one event is met.
The available events may vary based on your plan and whether you've enabled certain features. The following is a non-exhaustive list of available events.
| Event | Choices |
|---|---|
| When an action performed by... | - Agent - select specific agents added to your Helpdesk<br>- Requester - the ticket creator<br>- Agent or Requester - the assigned agent or the ticket creator<br>- Collaborator - any Collaborator agents. Learn more.<br>- System - Freshdesk itself. |
| Involves any of these events (human events) | These events are visible when you select a non-System option in the first block:<br>- Default or custom ticket property is changed<br>- Agent or Group is updated<br>- Note is added<br>- Reply is sent<br>- Customer feedback is received<br>For many of these, you can specify exact values to target hyperspecific events, e.g. Status is changed from Pending to Resolved. |
| Involves any of these events (system events) | These events are visible when you select System in the first block:<br>- Mail sent to address failed (requester, or CC or forward address)<br>- Forward thread failed<br>- Ticket is marked overdue (for first response, next response, or resolution) |
Conditions
Below the events blocks, there is a block called On tickets with these properties. This block filters when the rule is run based on a value in the ticket or its associated contact or company.
The available conditions may vary based on your plan and whether you've enabled certain features. The following is a non-exhaustive list of available conditions.
| Condition | Choices |
|---|---|
| In Tickets | - The email address of the requester, or the To or CC fields<br>- Default or custom ticket properties, including tags<br>- Updated during, after, or before specific business hours<br>- Latest interaction or number of interactions from the requester or agents<br>- Whether the ticket is merged, has attachments, or comes from a specific ticket form<br>- Custom objects. Learn more. |
| In Contacts | - The requester's email, name, title, timezone or language<br>- The segment of the requester |
| In Companies | - The company's name, domain, health score, tier, industry, or renewal date<br>- The segment of the company |
Each of these has specific contextual filters to target hyperspecific cases. For example:
You can chain conditions to create complex use cases.
- If the ticket was created by someone at the "Acme Inc" company AND the ticket subject contains any of these words - "urgent", "escalation", "problem", or "serious" - OR if the Source of the ticket is "Phone" or "Walk-in" (for any company) - OR if the Priority of the ticket is "Urgent" (for any company)
Actions
Below the conditions block is the Perform these actions block. When the rule is triggered, the actions specified here are executed in order. You can define multiple actions by clicking Add new action.
The available actions may vary based on your plan and whether you've enabled certain features. The following is a non-exhaustive list of available actions:
If you choose to update a field, that field's type is automatically validated. For dropdown fields, you can only select from valid options and for numerical and date fields, you can only provide valid numbers and dates. For text-based actions such as emails and notes, you will be able to use dynamic placeholders to insert ticket properties.
``` Note: 1) Private notes added by agents with restricted access to tickets will also triggerr ticket update automation rules. 2)There is an additional action called Trigger webhook that enables much more functionality. See Using webhooks in automation rules. ```
Once you are done adding events, conditions, and actions, click Preview and Save. A summary will be auto-generated. Review it and click Save and enable.

Examples and use cases
The following are step-by-step instructions to create automation rules for particular use cases.
Pre-configured automation rules on ticket updates
To help you get started, Freshdesk provides a standard set of automation rules. You can choose to enable, disable, or modify them based on your requirements.
Automatically assign ticket to first responder
When an agent replies to an unassigned ticket, this automation rule assigns the ticket to the agent so that they can continue to take ownership. Click on the rule to view or edit the rule.

Automatically reopen tickets when the customer responds
The recommended best practice for agents is to focus on ticket views that only have open tickets. This ensures a clutter-free view and eliminates the need for agents to monitor for customer responses.
When a customer responds to a resolved or closed ticket, this automation rule automatically reopens it, making it appear in an agent's open ticket view.
To ensure not all tickets are reopened, the rule executes only if one of the conditional blocks matches:
If the above conditions match, the ticket will be automatically reopened, and an email will be sent to the assigned agent.
If you prefer to create a new ticket instead of reopening old ones, scroll down to the Perform these actions section. Click the dropdown that says "Set Status As" and change it to "Create a new ticket".
Click on the rule to view or edit the rule.

Add assigned agent as a watcher on the ticket
This rule lets you monitor and keep track of tickets that receive negative feedback and have a low health score.
The rule triggers when an agent updates the status of a ticket to pending (from any status) and if the associated company’s health score is “doing okay”, then the assigned agent will be automatically added as a watcher on the ticket.
Click on the rule to view or edit the rule.

Create a new ticket via Webhook on replies to closed tickets
Note: By default, the rule is disabled. You can enable it using the toggle button next to the rule name.
The rule triggers whenever a customer replies to a closed ticket and automatically creates a ticket via the webhook. To know more about using webhooks to create automation rules, refer to Using Webhooks.

Automate ticket management
These are common use cases for reducing tedium and maintenance of tickets.
Prevent a closed ticket from reopening when a customer replies
Tickets automatically reopen when there's a customer response because of the enabled automation rule - Automatically Reopen tickets after the customer responds (under Admin > Workflows > Automations > Ticket updates tab). You can disable/modify this rule for it to not work for tickets that are 'Closed'.
Furthermore, when there's a reply from the requester on a ticket with status set to Closed, you can trigger a webhook to create a new ticket with the latest response as the ticket's description ( using placeholders).
Here is the screenshot of the sample configuration.

Here's the API documentation that will help you with the webhook.
If tickets have to be reopened when a customer responds, you can set up a simple rule by following the steps mentioned in this video.
https://www.youtube.com/watch?v=EFo0ZShRRgU&list=PLsYJ3BsyR4qGFujlW0iDtOBOf4IPVsAqt&index=13
Notify an agent if a note is added to a ticket by a third party
There is no default email notification when a third party adds a note. However, you can set up an automation rule to ensure agents stay informed about relevant updates. To create this rule:
1. Go to Admin > Workflows > Automations. 2. Click New Rule from the Ticket Updates tab and enter the rule name. 3. Choose the following events, conditions, and actions:
| When an action performed by -> Agent or requester.<br>Event: Note is added ->Private note<br>Condition: None<br>Operator: Match Any of the below conditions<br>Action 1: Set status as -> Open<br>Action 2: Send email to agent -> Assigned agent.<br>Customize the email subject and description according to your requirements. You can also use placeholders for your emails. |
4. Click Preview and Save. 5. After you preview the rule, click Save and enable.

Prevent specific agents from closing tickets
You can create an automation rule to reopen any ticket that is closed by specific agents. To create this rule:
1. Go to Admin > Workflows > Automations. 2. Click New Rule from the Ticket Updates tab and enter the rule name. 3. Choose the following events, conditions, and actions:
| When an action performed by -> Agent and choose the agent name.<br>Event: Involves any of these events -> Status is changed -> from any status -> to closed.<br>Condition: Choose the conditions you want to match. For example, you can select tickets that have high priority.<br>Operator: Match Any of the below conditions<br>Action: Set status as -> Open. |
4. Click Preview and Save. 5. After you preview the rule, click Save and enable.
Notify agents when a ticket is deleted
Automatically alert agents whenever a ticket is deleted and help them stay updated on ticket updates. To create this rule:
1. Go to Admin > Workflows > Automations. 2. Click New Rule from the Ticket Updates tab and enter the rule name. 3. Choose the following events, conditions, and actions:
| When an action performed by > Agent<br>Event: Ticket is > Deleted<br>Operator: Match Any of the below conditions<br>Action: Send Email to the group and choose the preferred group.<br>Customize the email subject and description according to your requirements. You can also use placeholders for your emails. |
4. Click Preview and Save. 5. After you preview the rule, click Save and enable.

Add tags for merged tickets
While it's not feasible to filter all merged tickets directly, you can create an automation rule that automatically assigns tags to a ticket as soon as they are merged. You can use the assigned tags to identify and manage merged tickets. To create this rule:
1. Go to Admin > Workflows > Automations. 2. Click New Rule from the Ticket Updates tab and enter the rule name. 3. Choose the following events, conditions, and actions:
| When an action performed by -> Agent.<br>Event: Involves any of these events -> Note is added ->Any<br>Condition: In Tickets -> Last Interaction -> contains > Enter merged into<br>Operator: Match Any of the below conditions<br>Action: Add Tag and enter the tag name. |
4. Click Preview and Save.
5. After you preview the rule, click Save and enable.
Once this is done, you can automatically filter all tickets with the tag you entered.

Automate email notifications
These are common use cases for notifying agents or customers about important events.
Automatically send email notifications for specific events
With automation rules, you can send reminder emails based on specific events. For example:
To create this rule:
1. Go to Admin > Workflows > Automations. 2. Click New Rule from the Ticket Updates tab and enter the rule name. 3. Choose the following conditions and actions:
| When an action performed by -> Agent or Requester.<br>Event: Status is changed -> From Any Status -> To Closed or Resolved<br>Condition: In tickets -> if Group -> is -> Enter the Group name.<br>Operator: Match Any of the below conditions<br>Action: Send email to Requester<br>Customize the email subject and description according to your requirements. |
4. Click Preview and Save. 5. After you preview the rule, click Save and enable.
Notify customers about agents who are out of office
You can notify customers if they've contacted an agent during non-working hours. To create this rule:
1. Go to Admin > Workflows > Automations. 2. Click New Rule from the Ticket Updates tab and enter the rule name. 3. Choose the following events, conditions, and actions:
| When an action performed by -> Requester.<br>Event: Reply is sent<br>Condition: In Tickets -> If assigned agent is -> Choose the agent name.<br>Toggle the check agent status option and choose is out of office -> any number of days<br>Operator: Match Any of the below conditions<br>Action: Send Email to requester.<br>Customize the email subject and description according to your requirements. You can also use placeholders for your emails. |
4. Click Preview and Save. 5. After you preview the rule, click Save and enable.

Receive notifications for tickets that are assigned to another agent
To receive notifications about any updates on specific tickets that are not assigned to you or that you are not a part of, you can add yourself as a 'Watcher' on the ticket page. Alternatively, you can automate this by setting up an automation rule. To create this rule:
1. Go to Admin > Workflows > Automations. 2. Click New Rule from the Ticket Updates tab and enter the rule name. 3. Choose the following conditions and actions:
| When an action performed by > Requester.<br>Event: Involves any of these events > Reply is sent.<br>Condition: In tickets > if Requester email > is > Enter the requester email id.<br>Operator: Match Any of the below conditions<br>Action: Send email to agent and choose your name.<br>Customize the email subject and description according to your requirements. You can also use placeholders for your emails. |
4. Click Preview and Save. 5. After you preview the rule, click Save and enable.
Automate Customer Satisfaction (CSAT) surveys
Customer Satisfaction (CSAT) surveys are a commonly used key performance indicator to track your support experience with the customers. These are common use cases for using CSAT surveys.
Send CSAT surveys to customers
Send CSAT surveys to customers based on different scenarios. Here are a few examples:
To create this automation rule:
1. Go to Admin > Workflows > Automations. 2. Click New Rule from the Ticket Updates tab and enter the rule name. 3. Choose the following events, conditions, and actions:
| When an action performed by -> Agent.<br>Event: Status is changed -> Any status -> Resolved<br>Condition: In tickets -> If Group -> Is -> Enter the Group name. For example, Support<br>Operator: Match Any of the below conditions<br>Action: Send email to Requester<br>Customize the email subject and description according to your requirements. Make sure to add the survey link. |
4. Click Preview and Save. 5. After you preview the rule, click Save and enable.
Notes:

Address tickets based on CSAT responses
With automation rules, you can automate workflows based on the CSAT survey responses. For example:
To create this automation rule:
1. Go to Admin > Workflows > Automations. 2. Click New Rule from the Ticket Updates tab and enter the rule name. 3. Choose the following events, conditions, and actions:
| When an action performed by > Requester<br>Event: Customer feedback is > Extremely dissatisfied<br>Condition: Choose the condition based on which you want to trigger the rule. For example, you can choose In Tickets -> If Group -> is -> Enter the group name. Example: Support, Sales.<br>Operator: Match Any of the below conditions<br>Action 1: Set status as > Open.<br>Action 2: Send Email to Agent, choose agent, and customize the email. |
4. Click Preview and Save. 5. After you preview the rule, click Save and enable.
CSAT responses
For additional support, contact support@freshdesk.com.